Series: All Victron RV Electrical
This series covers our build of an all Victron electrical system. Take what is helpful and leave the rest—build your system for your own needs. Cheers!
Note: We are not sponsored by Victron, but we are Amazon and Tnutz affiliates.
Part 4: Wiring and Configuration
Part 5: Orion XS 1400 – Concept
Part 6: Orion XS 1400 – Design
Part 7: Orion XS 1400 – Installation
Introduction
In the last post I covered why a DC-DC charger is necessary when you want to draw high charge current from an alternator, why the Orion XS 1400 is a charger worth waiting for, followed by a brief discussion of what we hoped to achieve.
In this post I start with an overview of our DC-DC charging system, including components that we purchased. Then I go into more detail about design decisions that were made.
Electrical Design
The diagram below shows the major components of the entire electrical system, with the exception of the Cerbo GX. See Part 2 of this series for a discussion of the major components. Here I focus on the pieces necessary for charging from the alternators.

Starting from the top-left, 2/0 cables run from the driver-side starter battery to the electrical cabinet in the back of the truck inside the Project M.
The negative terminal of the driver-side truck battery is utilized as the single connection point to chassis ground. A 2/0 cable runs from it to the cabinet negative bus bar, where all negatives and grounds in the system connect. This includes the ground connections on the Orion XS units.
The positive terminal of the starter battery connects to a Blue Sea 7148 150A circuit breaker in series with a Blue Sea 7765 150A continuous duty solenoid.
I opted for a breaker rather than a fuse to have more control. I went with a beefy 187 series breaker because it has larger (5/16″ – 18, M8) terminals compared to the 285 series (1/4″ – 20, M6). The 187 series spec says it only accepts up to 1/0 lugs, but my 2/0, 5/16″ lugs fit without a problem.
The control coil of the solenoid is connected to truck upfitter switch #1 wire (brown/green) in series with a 5A inline fuse. In this configuration the solenoid can only be energized when the truck is running and the upfitter switch is on. When energized, alternator charging power is made available to the electrical cabinet.
A 2/0 cable runs from the solenoid output to a 3/8″ Blue Sea terminal feed-through connector on the electrical cabinet in the bed of the truck. Attached to the back side of this connector inside the cabinet is a Blue Sea 2151 dual MRBF terminal fuse block. Attached to it are two 4 AWG cables, protected by 75A MRBF terminal fuses, which run to the Orion XS unit inputs.
The output of each Orion XS connects to a Blue Sea 5196 3-circuit common fuse block with 4 AWG cables and are protected by 75A MRBF terminal fuses. The output of this fuse block connects to the Lynx Distributer with 2/0 cable and is protected by a 100A mega fuse.
How many amps are available while driving?
On our Ford F350 truck we have dual alternators, one 220A primary, driver side, and one 157A secondary, passenger side, for 377A total. The primary alternator runs all the time and the secondary kicks in as needed.
In addition to alternator current used for charging the house batteries, there are other loads to be considered which add to the total:
| Item | Typical Current Draw |
|---|---|
| Dual Starter Battery Charging | 30 – 60A |
| Baseline truck electronics | 15A |
| Infotainment/USB/gauges | 10A |
| A/C | 30A |
| Heater (blower only) | 20A |
| Heated Seats | 4 – 10A per seat, depending on level |
| 12V Outlets | Variable |
| 400W Truck Inverter 120V Outlet | Variable |
A common scenario for our case is the need to charge as much as possible on a hot day. We have been camped the previous night and our truck starter batteries also need a little charging. Loads other than charging our house batteries might be:
- Dual starter battery charging (50A)
- Baseline truck electronics (15A)
- Infotainment/USB/gauges (10A)
- A/C (30A)
These total 105 amps, which leaves 377A – 105A = 272A for charging.
Wow, 272A to charge our house batteries, unbelievable! And not true. This is because 377A is rated or max(peak) capacity, not continuous. Continuous current is how much an alternator can supply over a length of time without overheating or failing. Factors such as alternator temperature, engine speed (rpm), and ambient temperature reduce real-world continuous output.
Determining what your alternators can safely handle without burning up is a bit nebulous. My impression is that half to two-thirds rated capacity is a good starting point for determining safe continuous current draw.
Let’s say 60% of rated capacity is what we are shooting for. Recalculating our hot day scenario, we have 0.60 * 377A – 105A = 121A. I can work with that.
Regardless, it is critically important to keep the effects of excessive heat in the back of your mind when deciding where to set charge current at any given time.
How many amps are available at idle?
I knew there would be times we would want to charge without needing to pack up camp and drive around. However, idling impacts alternator output differently than driving, because alternator RPM is low and no natural airflow is available to keep alternator temperature at a safe value.
My research led to the installation of a high idle kit. It includes a potentiometer switch that allows you to set engine rotation speed from 900 to 3000 RPM. By increasing engine RPM above normal idle speed, more current is available for charging, and higher fan speed for both the engine and alternator helps to moderate temperature. Additionally, by increasing RPM the alternator operates in a more efficient range of it’s power output curve, which reduces internal electrical resistance and heat buildup.
To illustrate I’ve included the output curves for our alternators taken from Ford specs. You can see:
- As temperature increases output current decreases,
- Initially output current increases rapidly followed by diminishing returns at greater RPM.
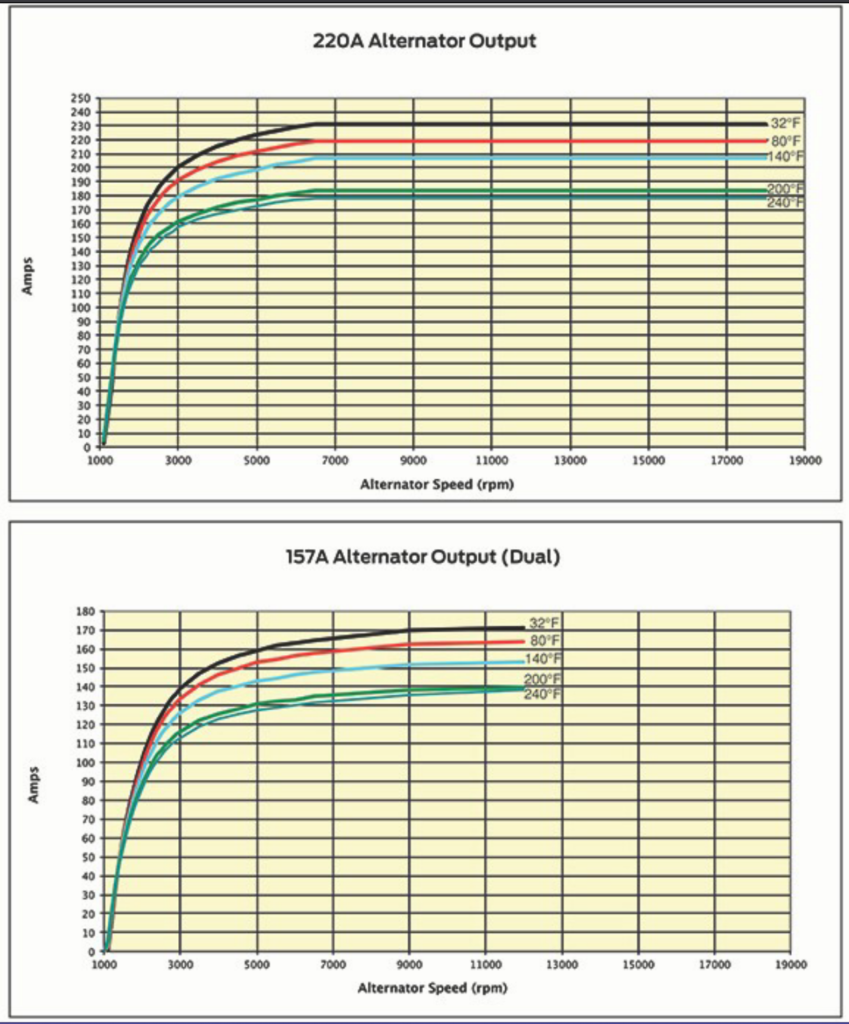
Based on these curves and other analysis, we plan to set engine idle speed somewhere around 1350 RPM to maximize available charge current. This speed is sufficient to achieve high current output without overworking the engine.
Since the curves show alternator rather than engine RPM, a little math is required to see how engine RPM relates to output current. To calculate engine RPM, a pulley ratio of 3.09:1 is given for the 220A alternator and 2.78:1 for the 157A alternator. To see the impact of different RPMs on output, let’s look at 1350 RPM +/- 150:
Engine RPM = 1,200 rpm
- 220A Alternator RPM = 1,200 × 3.09 = 3,708 rpm
- 157A Alternator RPM = 1,200 × 2.78 = 3,336 rpm
Engine RPM = 1,500 rpm
- 220A Alternator RPM = 1,500 × 3.09 = 4,635 rpm
- 157A Alternator RPM = 1,500 × 2.78 = 4,170 rpm
Reading from highest to lowest temperature curves and applying the above results:
Engine RPM = 1,200 rpm
- 220A Alternator (3,708 RPM): 165–215A
- 157A Alternator (3,336 RPM): 115–145A.
- Total Current: 280 – 360A
Engine RPM = 1,500 rpm
- 220A Alternator (4,635 RPM): 170–220A
- 157A Alternator (4,170 RPM): 125–155A
- Total Current: 295 – 375A
This shows that the charge current is there when we need it. However, potential diesel engine problems such as wet stacking and clogging of the EGR system are still a possibility even with high idle. And, repeat exposure to excessive heat from high current loads can shorten alternator life. For these reasons we plan to idle charge only as necessary.
Why two Orion XS 1400s?
Based on the scenario discussed above we should have over 100A available for charging. And, we want our alternators to be our primary charge source—as much power as possible without burning them up.
Therefore, since each Orion XS 1400 has a current rating of 50A we went with two units for 100A total.
The decision to go with two units is also based on our expected energy usage and typical drive times when we can charge. Normally our daily usage is around 20% battery state of charge (SOC). For charging, travel days can vary from 30 minutes to four hours or more. We also have “down days”, where we stay parked in camp for two or more nights.
To illustrate our charge capability with this setup, a steady hour of driving is:
- 1 hour * 1335W = 1335Wh or 22% SOC for our 5.12kWh battery.
1335W is a typical combined DC-DC maximum charge value we see while driving. It tends to start in the 1340s, and, as the system heats up, voltage drops at the charger inputs as resistance increases with temperature, thus charge power decreases.
The charge we actually get on a travel day is highly variable. On a hot day or if we are driving slowly on a grade, rough road, or in a city, the house battery realizes less of a charge. Usually this is by choice, since we explicitly adjust the current down or disable one or both chargers to account for these conditions.
Why all the 2/0 cable?
Once you determine minimum allowable cable size with regard to ampacity, there remains good reasons why you should go bigger, especially for DC systems with high current loads. It all stems from the need to minimize voltage drop—the voltage difference between source and load.
To illustrate, I will compare voltage drop of 2 AWG versus 2/0 AWG cable. Based on this chart, 2 AWG is the smallest cable that can safely carry 100A continuously for a 50 foot round trip.
Now consider voltage drop. The formula is:
Vdrop = I * R * L / 1000
Where:
I = full load current (Amps)
R = Resistance (Ohms/1000ft)
L = Roundtrip Length (ft)
Voltage drop at 100A full load current for copper cable resistance at 25°C is:
- 2 AWG: Vdrop = 100 * 0.1593 * 50 / 1000 = 0.79650V
- 2/0 AWG: Vdrop = 100 * 0.07947 * 50 / 1000 = 0.39735V
Let’s say alternator voltage is 14.1V @100A current draw. This would mean a voltage drop of 5.65% for 2 AWG and 2.81% for 2/0 AWG. 3% voltage drop or smaller is recommended. Why?
Sometimes voltage dips so low that it can cause issues at the charger, for example excessive cycling on and off. An issue that effects all chargers caused by voltage drop is less input power:
- 2 AWG: Powerin = V * I = (14.1V – 0.79650V) * 100A = 1330W
- 2/0 AWG: Powerin = V * I = (14.1V – 0.39735V) * 100A = 1370W
Most critical—and less clear as it relates to voltage drop—is excessive heat at connections due to undersized cable. Oxidation, corrosion, and loosening caused by expansion and contraction is accelerated. Larger cable has larger lugs and clamping area, lower contact resistance, therefore less I2R heat.
Bigger is better, safer, and more reliable.
Why install a solenoid?
There is a multitude of ways the Orion XS 1400 may be controlled without a solenoid, including:
- VictronConnect over Bluetooth
- GX device over Wi-Fi
- DVCC
- VRM
- Engine Shutdown Detection
- Engine Shutdown Detection Override Wiring (i.e. disable charging via ignition switch)
- Various ways to wire the remote switch: Simple On/Off switch, BMS controlled, etc.
However, by connecting a solenoid’s control coil to one of your vehicles upfitter switches (if equipped), handy “belt and suspenders” redundant control is made possible.
By default all upfitter switches on our truck provide power only when the truck is running. The solenoid ensures no charging occurs when the truck is off and there is no chance of accidental discharge of the starter batteries.
Also, since the solenoid coil is connected to an upfitter switch, you also have instantaneous manual control. This is handy when you quickly want to turn charging off when pulling a steep grade or you want to cool down the alternators for a couple minutes before the end of a drive.
Solenoids are designed to switch high currents with little contact wear. They have features such as specialized contact material and surface treatment, arc suppressing geometry, plus fast switching with high contact pressure.
If you go this route ensure the solenoid you purchase (like our Blue Sea 7765) is rated for continuous duty as opposed to a starter solenoid, which is only rated for high current in short bursts.
Next Up
In the next post I cover the install: under the hood, inside the electrical cabinet, plus configuration of the chargers.
Parts List
Here is a list of items we purchased to build our system.
You can navigate the Excel spreadsheet below directly or download the file through the download button on the bottom right.
We are Amazon affiliates and appreciate your purchases through the provided links.
We are also Tnutz affiliates. They offer the lowest prices on the web for aluminum extrusions, brackets, and much else. Before ordering through Tnutz check out this page to learn how to save on shipping.
Thank you!